The Importance of Test Strips in Darkroom Printing
Darkroom printing is a beautiful, tactile process, but it requires precision and understanding. One of the most fundamental, yet often overlooked, techniques for achieving consistently excellent prints is the use of test strips. If you’re serious about black and white darkroom photography, mastering test strips is absolutely crucial. This article will explain why they're vital, how to create them, and how to interpret their results to achieve accurate exposure and contrast.
Why Are Test Strips So Important?
Think of a test strip as your guide to the perfect print. The overall exposure of your negative, combined with the paper's characteristics, determines the final image's brightness. Contrast, the range of tones from black to white, further shapes the appearance. Without a test strip, you're essentially guessing. You risk either underexposing (resulting in a dark, muddy print) or overexposing (producing a washed-out, featureless print). A test strip allows you to systematically vary the exposure time and see firsthand how it affects the image before committing to a full-sheet print.
Furthermore, test strips are invaluable for understanding how different developers and paper grades affect contrast. Varying the exposure and testing different paper combinations is the key to artistic control. Some photographers even experiment with contact printing alongside test strips to gain a broader understanding of their negatives and paper combinations.
Creating Your Test Strip
Creating a test strip is incredibly simple and requires minimal materials. Here's a step-by-step guide:
- Prepare Your Materials: You'll need a piece of darkroom paper (the same grade you intend to use for your final print), your developing tray, and a piece of tape.
- Tape Down the Paper: Place a piece of tape along one edge of your darkroom paper, extending into the developing tray. This will keep the paper secure and allow for even development.
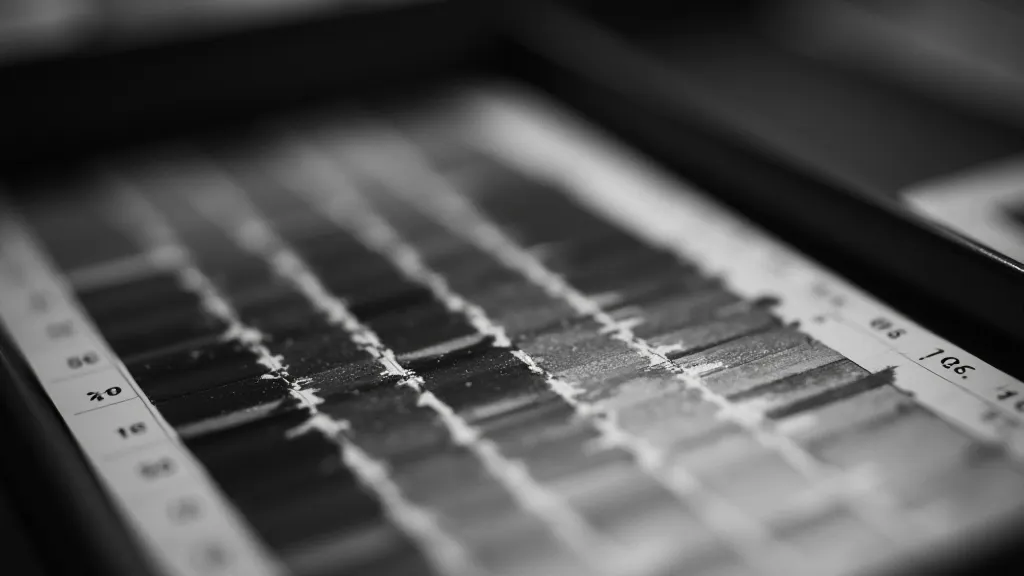
- Expose a Portion: Place the taped paper under the enlarger and expose a small section of the paper. The amount of exposed area will dictate how many test exposures you’re able to take.
- Mask and Shift: Use a piece of cardboard or another piece of paper to mask the exposed portion. Shift the mask slightly (usually about 1/4 inch or 0.6 cm) to expose a new section of the paper.
- Repeat: Repeat the masking and shifting process multiple times, creating a series of progressively exposed strips on the same piece of paper. Aim for at least 6-8 strips to give you a good range of exposure options.
- Develop: Develop the test strip using the same process you would use for your final prints.
Interpreting Your Results
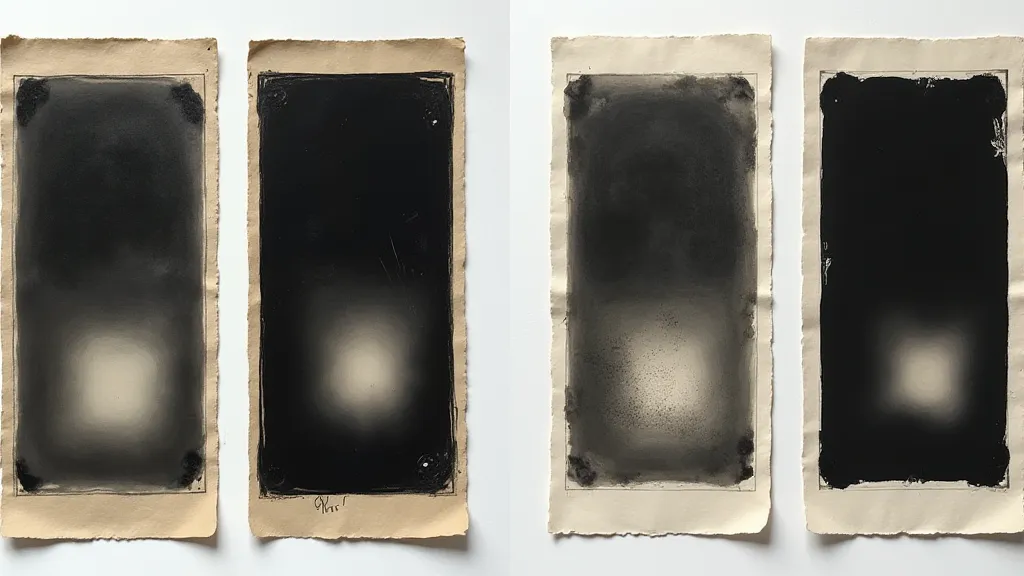
Once your test strip is developed, it’s time to analyze the results. Carefully examine each strip, looking for the tonal range that best represents the scene in your negative.
Here's what to look for:
- Highlights: Are the highlights (brightest areas) completely white, or do they retain some detail? If they’re completely white, you may be overexposing.
- Shadows: Are the shadows (darkest areas) solid black, or do they contain detail? If they're solid black, you may be underexposing.
- Midtones: The midtones are the key to a well-balanced print. Look for a good tonal separation within the midtones – a smooth transition from dark to light.
- Contrast: Does the overall range of tones look pleasing, or is it too flat or too contrasty?
Don’t be afraid to experiment! Varying the paper grade (e.g., a softer paper will reduce contrast) can also drastically alter the final image. Achieving specific artistic effects can sometimes benefit from unconventional techniques – those wanting to extend their tonal range might also consider working with selenium toner for enhanced archival qualities and subtle artistic shifts.
Beyond Exposure: Contrast Control
Test strips aren’t *just* for exposure. They are also key to understanding and controlling contrast. By varying the developer, the paper grade, and the exposure time you can fine-tune the contrast of your prints. For example, a resin-coated (RC) paper will typically have lower contrast than a fiber-based paper. A more aggressive developer, like Dektol, will increase contrast, while a weaker developer like Ilford Multigrade will reduce it. The possibilities are truly vast, allowing for expressive and unique prints.
Understanding how to manipulate contrast can be a deeply rewarding journey. Beyond the standard developers, skilled darkroom practitioners often explore more experimental approaches. Some pursue methods like experimental toning techniques in the darkroom to create prints with unique color shifts and tonal qualities. These techniques often require careful test strip analysis to achieve predictable results.
Advanced Techniques and Considerations
While the basics of test strip creation and interpretation are straightforward, there are nuances that can significantly impact your results. For instance, the type of enlarger you’re using – a diffusion transfer enlarger will behave differently than a modern, high-resolution enlarger. Film type also plays a crucial role; negatives from different films will exhibit varying contrast characteristics.
Furthermore, the age and condition of your paper can impact its response to exposure and development. Always use fresh paper for best results, and store your paper properly to prevent deterioration. Consider environmental factors too – humidity and temperature can affect development times and contrast.
It’s also important to consider the relationship between exposure and paper density. Some papers are inherently denser than others, meaning they require less exposure to achieve the same level of black. This is something you’re likely to discover through diligent test strip analysis.
Troubleshooting Common Issues
Even with careful planning, you might encounter challenges when using test strips. Here are a few common problems and how to address them:
- Uneven Development: This can be caused by improper tray rocking or uneven temperature. Make sure to agitate the developing tray consistently and keep the temperature as stable as possible.
- Fogged Test Strip: This indicates light leaks in your darkroom. Seal any potential light sources and ensure your safelight is functioning correctly.
- Inconsistent Results: This can be caused by fluctuations in developer strength or paper quality. Prepare fresh developer regularly and use paper from the same batch.
Beyond the Basics: Splitting Grades and Creative Exploration
Once you’re comfortable with the fundamentals of test strip analysis, you can start exploring more advanced techniques. One fascinating approach is exploring split-grade printing. This technique involves using two different paper grades within a single print, allowing you to control contrast in different areas of the image. It’s a powerful tool for creating dramatic and expressive prints.
Practice Makes Perfect
Like any darkroom technique, mastering test strips takes practice. Don’t get discouraged if your first few attempts aren’t perfect. Keep experimenting, observing, and learning from your results. With a little patience and attention to detail, you’ll be creating beautiful, well-exposed, and perfectly contrasted black and white prints in no time!